
Overview
This guide outlines the procedures for enabling Cloudflare support within Juggernaut Firewall, configuring Apache to correctly identify original visitor IP addresses, and integrating Cloudflare API credentials for seamless firewall management.
Cloudflare Architecture & Limitations
Because Cloudflare operates as a reverse proxy, all inbound traffic appears to originate from Cloudflare's IP addresses. Consequently, standard host-based firewall rules (such as those managed by iptables) cannot directly block the original attacker IPs, as the connection terminates at Cloudflare servers before being forwarded to your origin server.
To mitigate this, web server modules can extract the true visitor IP from custom HTTP headers. For additional technical details regarding these limitations, refer to Section 27 of the CSF firewall readme.txt.
Restore Original Visitor IP Addresses
Configure your web server to parse Cloudflare headers and log the actual visitor IP addresses.
AlmalInux / CloudLinux / RHEL
Plesk provides dedicated packages for this module. Execute the following commands to install the package and restart Apache:
// install the mod_cloudflare package
yum install mod_cloudflare

// restart apache
systemctl restart httpd
Debian / Ubuntu
Plesk does not provide a dedicated package for Debian/Ubuntu. Instead, enable the built-in Apache module and configure it manually:
a2enmod mod_remoteipCreate a new configuration file at /etc/apache2/conf-available/remoteip.conf and populate it with the following content:
RemoteIPHeader CF-Connecting-IP
# IPV4
RemoteIPTrustedProxy 103.21.244.0/22 103.22.200.0/22 103.31.4.0/22 104.16.0.0/13 104.24.0.0/14 108.162.192.0/18 131.0.72.0/22 141.101.64.0/18 162.158.0.0/15 172.64.0.0/13 173.245.48.0/20 188.114.96.0/20 190.93.240.0/20 197.234.240.0/22 198.41.128.0/17

# IPV6
RemoteIPTrustedProxy 2400:cb00::/32 2606:4700::/32 2803:f800::/32 2405:b500::/32 2405:8100::/32 2a06:98c0::/29 2c0f:f248::/32
Enable the configuration file and reload Apache:
a2enconf remoteip.conf
systemctl reload apache2
Configure Juggernaut Firewall Settings
Follow these steps to integrate Cloudflare with the firewall dashboard, authentication systems, and management widgets.
Ignore Cloudflare Network Ranges
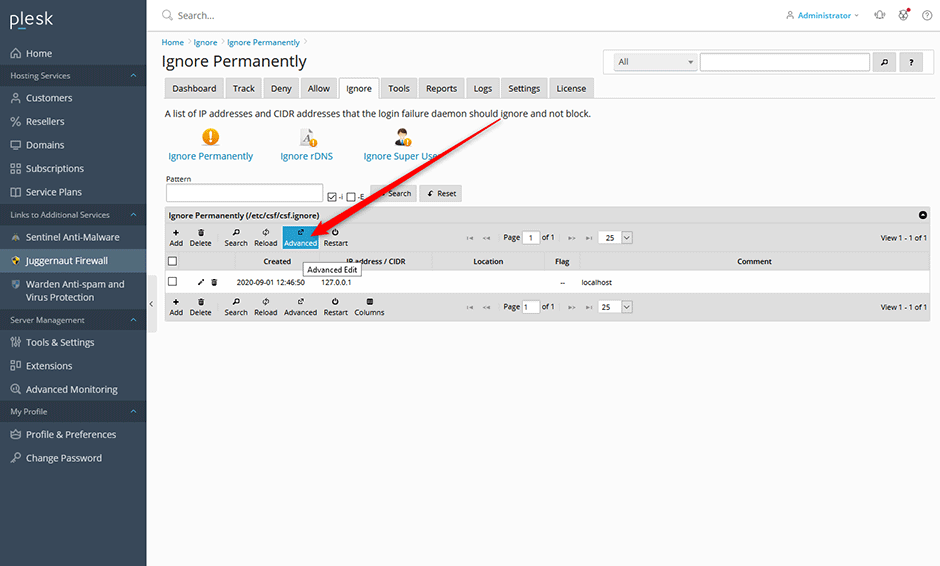
- Navigate to Juggernaut Firewall > Ignore Permanently.
- Click the Advanced button. Add the official Cloudflare IPv4 and Cloudflare IPv6 network ranges to the ignore list. This prevents the login failure daemon from blocking legitimate Cloudflare traffic.
- Click Update to save your changes.
- Click Restart to apply the new firewall and daemon rules.
Enable Cloudflare Support
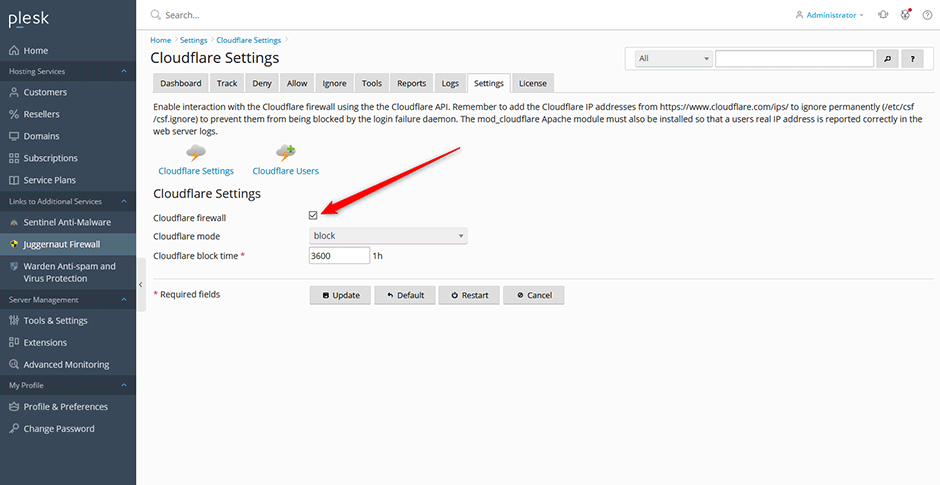
- Navigate to Juggernaut Firewall > Settings > Other > Cloudflare Settings.
- Select the Cloudflare firewall checkbox to activate support.
- Click Update to save your changes.
- Click Restart to apply the configuration.
Add Cloudflare API Credentials
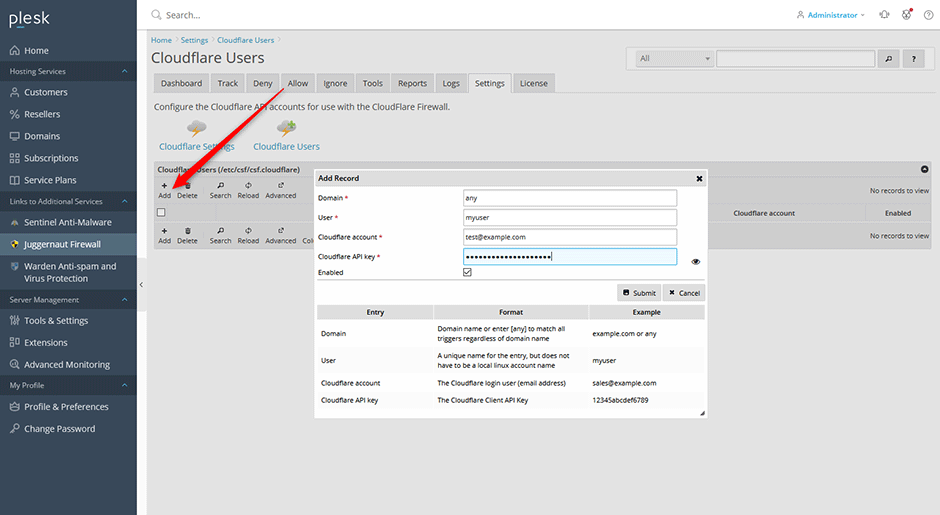
- Navigate to Juggernaut Firewall > Settings > Other > Cloudflare Settings > Cloudflare Users.
- Click the Add button in the grid interface. Enter your Cloudflare user API keys. Note: CSF requires legacy Global API Keys, not modern API Tokens.
- Click Submit to save the credentials.
- Click Restart on the grid to apply the changes.
Add the Cloudflare Actions Widget
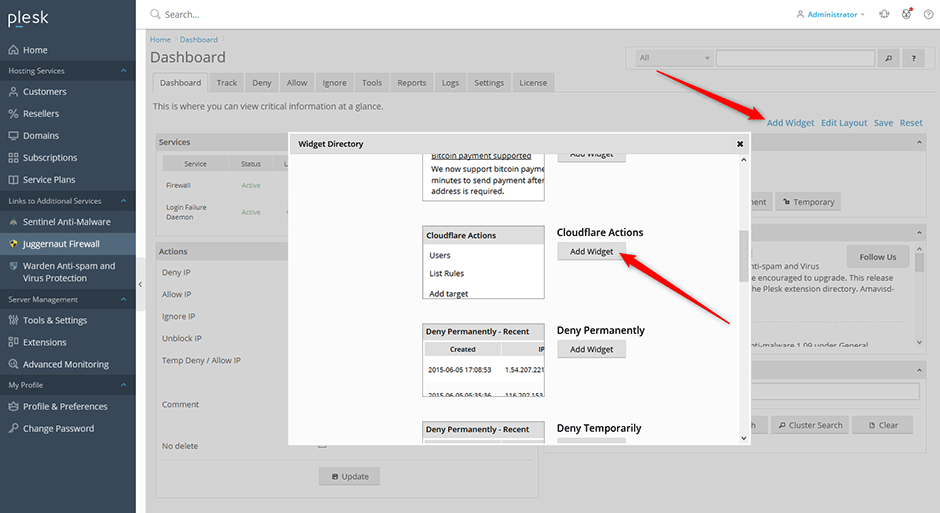
- Navigate to Juggernaut Firewall > Dashboard.
- Click the Add Widget button located in the top-right corner of the dashboard.
- Select the Cloudflare Actions widget and click its corresponding Add Widget button to install it.
Troubleshooting & Common Issues
- API Key Authentication Failures: Ensure you are using a legacy Global API Key. Modern Cloudflare API Tokens are not supported by the underlying CSF module.
- Incorrect IP Logging: Verify that the Apache module (mod_cloudflare or mod_remoteip) is active and that the configuration file syntax matches your operating system's requirements.
- Firewall Blocking Legitimate Traffic: Confirm that all current Cloudflare IPv4 and IPv6 ranges are listed in the Ignore Permanently section. Cloudflare periodically updates these ranges; review them quarterly to prevent false positives.
- Module Not Loading on Debian/Ubuntu: If Apache fails to start after enabling mod_remoteip, verify that the configuration file path matches your Apache version and that no syntax errors exist in /etc/apache2/conf-available/remoteip.conf.