Cloudflare Limitations
As CloudFlare is a reverse proxy, any attacking IP addresses (so far as iptables is concerned) come from the CloudFlare IP's. To counter this, an Apache module (mod_cloudflare) is available that obtains the true attackers IP from a custom HTTP header record (similar functionality is available for other HTTP daemons. However, despite now knowing the true attacking IP address, iptables cannot be used to block that IP as the traffic is still coming from the CloudFlare servers.
You can read more about these limitations in section 27. CloudFlare if the CSF firewall readme.txt
Restoring Original Visitor IP Addresses
Apache
Install the mod_cloudflare module. This will make sure that the users real IP address is reported correctly in the web server logs.
Centos/RHEL/CloudLinux
Plesk maintains their own mod_cloudflare pacakges so it should be a simple process to install:
// install the mod_cloudflare package
yum install mod_cloudflare

// restart apache
systemctl restart httpd
Debian/Ubuntu
Plesk does not have mod_cloudflare pacakges so we have to enable the mod_remoteip module in the Apache HTTP server:
a2enmod mod_remoteipAdd a /etc/apache2/conf-available/remoteip.conf file with this content:
RemoteIPHeader CF-Connecting-IP
# IPV4
RemoteIPTrustedProxy 103.21.244.0/22 103.22.200.0/22 103.31.4.0/22 104.16.0.0/13 104.24.0.0/14 108.162.192.0/18 131.0.72.0/22 141.101.64.0/18 162.158.0.0/15 172.64.0.0/13 173.245.48.0/20 188.114.96.0/20 190.93.240.0/20 197.234.240.0/22 198.41.128.0/17

# IPV6
RemoteIPTrustedProxy 2400:cb00::/32 2606:4700::/32 2803:f800::/32 2405:b500::/32 2405:8100::/32 2a06:98c0::/29 2c0f:f248::/32
Enable the remoteip.conf configuration file:
a2enconf remoteip.confReload or Restart Apache
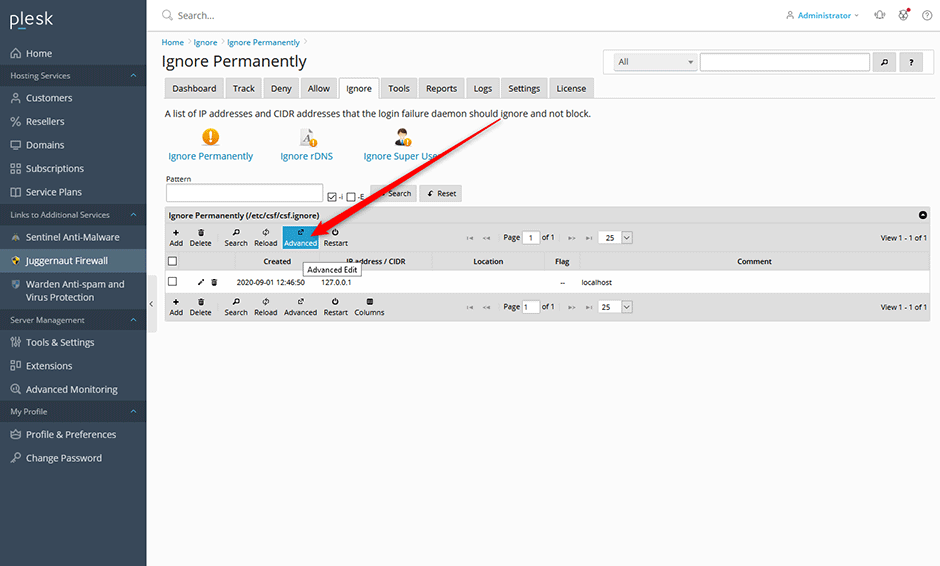
systemctl reload apache2Add the Cloudflare Network Ranges To Ignore Permanently
- Navigate to Juggernaut Firewall -> Ignore Permanently
- Click the Advanced button and add the Cloudflare IPv4 and Cloudflare IPv6 network ranges to ignore permanently so the login failure daemon will never block them.
- Click the Update button to save your settings.
- Click the Restart button to restart the firewall and login failure daemon.
Enable Cloudflare Support
- Navigate to Juggernaut Firewall -> Settings -> Other -> Cloudflare Settings
- Check the Cloudflare firewall checkbox to enable Cloudflare support.
- Click the Update button to save your settings.
- Click the Restart button to restart the firewall and login failure daemon.

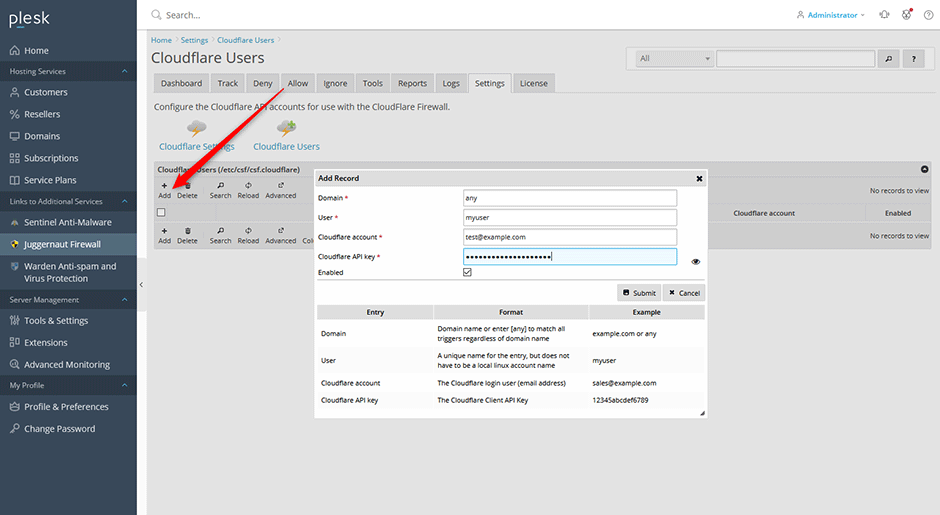
Add Your CloudFlare API Keys
- Navigate to Juggernaut Firewall -> Settings -> Other -> Cloudflare Settings -> Cloudflare Users
- Click the Add button on the grid to add any Cloudflare user API keys (CSF uses the older API keys not API tokens)
- Click the Submit button to save your settings.
- Click the Restart button on the grid to restart the firewall and login failure daemon.
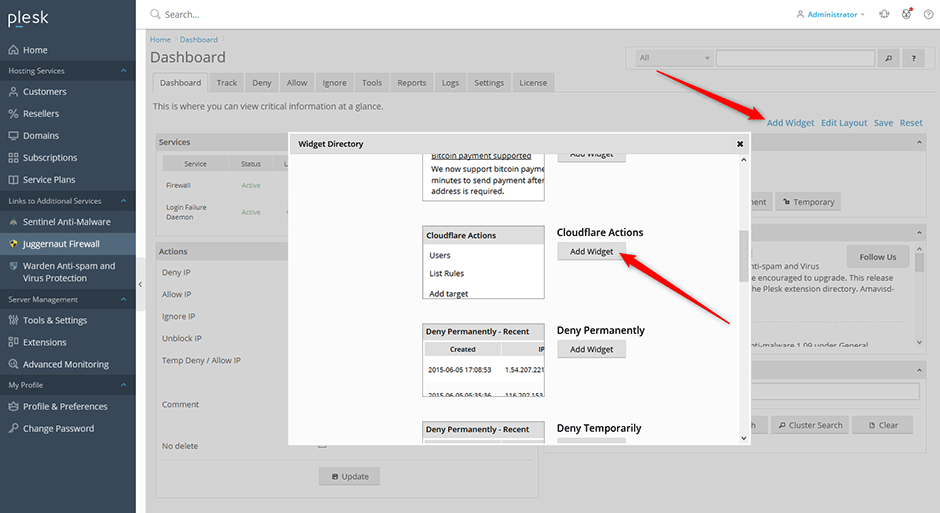
Add the Cloudflare Actions Widget To The Dashboard
- Navigate to Juggernaut Firewall -> Dashboard
- Click the Add Widget button on the top right of the dashboard.
- Click the Add Widget button below the Cloudflare Actions widget.